Create Password Protected Zip File Windows
Create Password Protected Zip File Windows: To zip files is widely used as zipped files are compact files and as such it is easier to transport the zip files over the web. To make the zip files more secure and reliable, they can be password protected.
There are different methods available to make password protect zip files. Windows XP has an in-built feature to protect zip files, whereas later versions of Windows don’t have such in-built features and you have to use some third-party utility or tool. Following shown are the methods on how to password protect zip files:
Password protect a zip file using WINRAR Utility
- Download and install the WINRAR utility on your computer.
- Select the file or folder you want to zip and password-protect. Right-click on its name.
- A context menu will be displayed. Select the ‘Add to archive’ option.
- Archive-name and parameters panel will be displayed. Select the ‘General’ tab from it.
- In the archive name section, the default file name will be displayed. If you want to change it, type the name. Select ‘ZIP’ as the archive format.
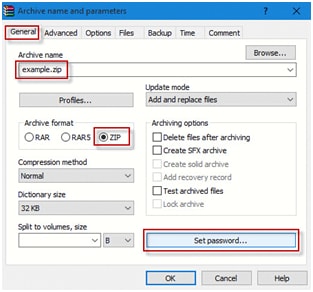
- Go on ‘Set Password’. Enter password dialog box will be displayed. Enter your password and re-enter it to confirm it. Then click on the ‘OK’ button.
- Go to the ‘OK’ button to complete the process.
Your file is now password protected zip file.
Password protect a zip file using 7-Zip Utility
- Download and install the 7-zip utility on your computer.
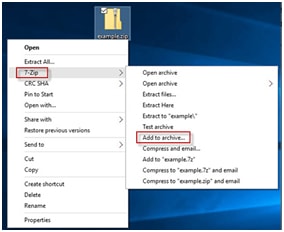
- Right-click on the file or folder you want to zip and password-protect.
- A context menu will be displayed. Select 7-Zip from it. Then select the’Add to archive’ option.
- An archive panel will be displayed. The default filename will be displayed. If you want to change the filename, type it. Select ‘Zip’ as the archive format. In the encryption box, enter your password and re-enter it to confirm. Then click on the ‘OK’ button.
This will create your zip file password protected.
Password protect zip file in Windows XP
- On your Windows XP, select the file you want to make password protected zip file.
- Double-click on the filename. A menu bar will be displayed. Click on the ‘File’ option.
- A context menu will be displayed. Then click on the ‘Add a Password’ option.
- A popup window will be displayed. Enter your password and re-enter to confirm it. Then click on the ‘OK’ button.
These will password protects your zip file. Read more articles on rozyjos.
More Related Queries: